Hello friends!

It’s been a really long time since I’ve last posted (my apologies. been really busy with the start of school and everything).

With all the activities lined up over the next few months, I think I’ll actually have to cut down on my baking by quite a bit :(

What I’ll be posting about today is something that I made over a month ago and already shared on Fever Avenue.

The recipe is of a simple tea cake with a top layer of apple crumble. The recipe was perfect. The cake delicious and the crumble complimenting it perfectly.

I won’t really blog much about it here. Head over to Fever Avenue for the recipe & loads more.

Promise to try update this space more regularly :(

Love

Eug

Click here for a recipe that will bring you lotsa joy!

Two days ago, the mom & I decided to bond over making cream puffs. My mom’s really good at making stuff like this & I had been wanting to learn how to make cream puffs. I’m glad to say that these turned out really well.

We dug up her old textbook (Professional Baking by Wayne Gisslen), and adapted the eclair choux puff recipe + the vanilla pastry cream to create the french cream puff. The recipes were reliable and easy to follow.

What we did was that we prepared the pastry cream first, followed by the choux puff. It was surprisingly simple to create, and just required us to watch it carefully (especially during the cooling process, to ensure that it doesn’t curdle). While we left the cream to cool, we started on the choux puff which became like a soft dough that was pipe-able.

While I’m really satisfied with the taste, I definitely have to brush up on my piping skills :S

Oh yes, it’s been raining and really gloomy the past few days, resulting in v horrible photos. Not just that, my Nikon DSLR is now hiding in the service centre, refusing to work :< Quite sad that I have to use a compact camera :/

Without further ado, here’s the recipe that I used for the cream puffs

Both recipes are adapted from Wayne Glissen’s Professional Baking

Vanilla Pastry Cream

Yield: about 2.25 litres

Ingredients:

  • 2l Milk
  • 250g Sugar
  • 8 Yolks  / 150g Yolks
  • 4 Whole Eggs / 220g Whole Eggs
  • 150g Cornstarch
  • 250g Sugar
  • 125g Butter
  • 30ml Vanilla (Essence/Oil/Extract)

Directions:

  1. In a heavy suacepan, dissolve sugar in the milk and bring just to a boil
  2. With a whip, beat egg yolks and whole eggs in a stainless steel bowl.
  3. Sift the starch and sugar into the eggs. Beat with the whip unti perfectly smooth.
  4. Temper the egg mixture by slowly beating in the hot milk in a thin stream
  5. Return the mixture to the heat and bing to a boil, stirring constantly.
  6. When the mixture comes to a boil and thickens, remove from the heat
  7. Stir in the butter and vanilla. Mix until the butter is melted and completely blended in.
  8. Pour out into a clean, sanitized hotel pan or other shallow pan. Dust lightly with sugar and cover with waxed paper to prevent a crust from forming. Cool and chill as quickly as possible. (I emitted the step of dusting lightly with sugar)

Eclair Paste

Yield: 1755g

Ingredients:

  • 500g Water, milk, or half water, half milk (I used all milk)
  • 250g Butter
  • 5g Salt
  • 375g Bread Flour
  • 625g Eggs

Directions:

  1. Combine the liquid, butter, and salt in a saucepan. Bring mixture to a full, rolling boil
  2. Remove the pan from the heat and add the flour all at once. Stir quickly.
  3. Return the pan to moderate heat and stir vigorously unitl the dough forms a ball and pulls away fromt he sides of the pan
  4. Transfer the dough to a mixer.
  5. WIth the paddle attachment, mix at low speed unti the dough has cooled lsightly (It should be 60degrees celcius which is still v warm but not too hot to touch)
  6. At medium speed, beat in the eggs a little at a time. Add no more than a quarter of the eggs at once and wait until they are completely absorbed before adding more. When all the eggs are absorbed, the paste is ready to use.
  7. Line sheet pans with silicone paper and fit a large pastry bag with a plain tube. Fill the bag with the eclair paste.
  8. Pipe round mounds of dough (to your preferred size)
  9. Bake at 215 degrees Celsius for 10 minutes. Lower heat to 190 degrees Celsius until mounds are well browned and crisp.
  10. Remove from oven and cool them.
  11. When cool, fill with pastry cream using a pastry bag with a star tube.
  12. Dust with confectioner’s sugar (if you want)
  13. Refrigerate and eat! :)

Note: I halved the recipe for both and  was still left with extra pastry cream to pipe about a quarter of the eclair paste recipe.

Hope you enjoy this recipe!

Stay tuned for more!


xx

Eug

After my last Tofu Cheesecake experience here, I decided making it again!

I’d seen Kitchen M’s Almost-No-Bake tofu Cheesecake quite a few times & was waiting for the opportunity to try it out. I finally got my lazy butt off to buy some Creme Fraiche yesterday, and viola! I made myself a tofu cheesecake.

I found this recipe much better than Alan Chow’s one in terms of fulfilling the term ‘cheesecake’. The only thing I”m going to change about it is to add less lemon juice (it was a tinge too sour for my liking), and add slightly more sugar. Otherwise, this recipe is really really good! It reminds me of the tofu cheesecake that they sell at Sun with moon, just less sweet.

Oh yes! One thing I didn’t follow from the original recipe was the cake base. Em made a sponge cake for the base. That was too much of a hassle for me & I just stuck with my usual biscuit base which is really effortless.

So here’s the recipe for you!

Tofu Cheesecake (adapted from Kitchen M’s Almost-No-Bake tofu Cheesecake)

Ingredients (makes 1 -8” cake pan, serves 12-16):

Sponge cake:

  • ½ c cake flour
  • 1 tsp baking powder
  • 1/8 tsp salt
  • 3 large eggs yolks
  • 1/3 c sugar
  • 1 tsp vanilla extract
  • 3 large egg white, at room temperature
  • 2 Tbsp sugar
  • 3 Tbsp unsalted butter, melted
  • ¼ tsp cream of tartar
  • Butter for greasing the pan

Directions:

  1. Preheat the oven to 350F and grease 8” springform pan with butter and line the bottom with parchment paper. Sift cake flour, baking powder and salt in a bowl and set aside.
  2. In a medium sized bowl, beat egg yolks and 1/3 c sugar together. When the mixture gets light in color and thick, add vanilla extract and continue to beat for another couple of more minutes.
  3. Gently, stir in dry mixture into the egg yolk mixture with rubber spatula. Do not over mix.
  4. In a large bowl, beat egg whites and cream of tartar with electric mixer on high speed until frothy. Add 2 Tbsp of sugar and continue to beat until stiff peak is formed.
  5. Gently, fold in 1/3 of egg whites into the egg yolk mixture and repeat the same for the rest of egg whites.
  6. Pour the batter into the prepared pan and bake for 10-15 minutes or until the toothpick inserted in the center comes out clean. Let it cool at the room temperature.
  7. When the cake is completely cooled, slice the cake horizontally into two or thirds – varying on desired thickness. (You can save the other piece for second batch or something else.)
  8. If you wish, clean the side of springform pan and re-attach. Leave the cake on the bottom and prepare the cheesecake filling.

OR

Biscuit Base:

  • 225g Digestive Biscuits
  • 60g Butter
Directions:
  1. Pound digestive biscuits till fine, or put in a blender
  2. Melt butter in microwave and add digestive biscuits to the melted butter
  3. Put in 8″ pan and leave in the fridge to set

Cheesecake Filling:

  • 5oz (150 g) Silken Tofu
  • 8 oz (1 pkg) Cream Cheese
  • 3 Tbsp Butter
  • ¼ c + 1 Tbsp Sugar
  • ¼ c Kabosu Juice (You can use lemon juice if not available)
  • ½ c Crème Fraiche
  • 2 Tbsp Gelatin Powder
  • ¼ c + 2 Tbsp warm water
Directions:
  1. In a large ceramic bowl (microwavable), add tofu, cream cheese and butter. Microwave for 5-10 seconds (x 3-4 times) to heat up a little bit at a time. (You don’t want the butter and cheese to melt completely.)
  2. Mix with wired whip. When mixture becomes smooth, add sugar and continue to mix. Then add Kabosu juice and crème fraiche and mix again.
  3. In a small ceramic bowl (microwavable) mix gelatin powder and warm water and mix well. If it’s not warm enough, microwave for 10-15 seconds. When gelatin powder is completely melted, stir it into the cheesecake mixture.
  4. Pour the cheesecake mixture into the prepared pan. Cover with plastic wrap and put it in the fridge for at least 4 hours. Serve chilled.

Hope everyone enjoys this recipe as much as I do!

Lemme know if you like it :)

xx

Eug

Hi guys!
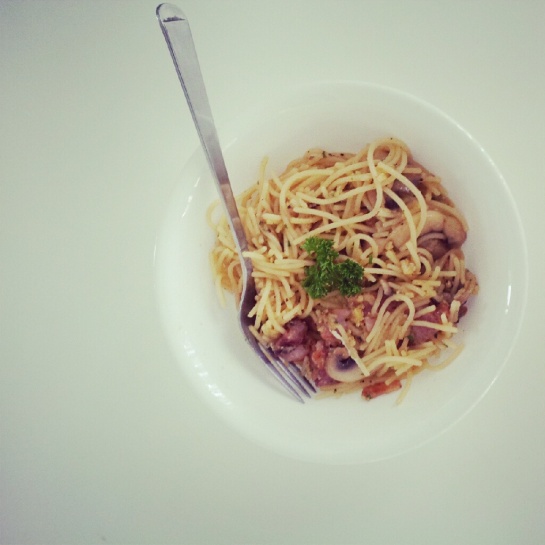
It’s been almost 2 months & I’m finally back with more! It’s not really what I usually do. This time, it’s under the category of cooking. After that 6 week holiday away from home, I equipped myself with some new skills so that I could whip up something whenever I missed Singapore’s food. Kudos to my sis for imparting all her exchange skills on me :)

While we were in Rome, we had the best carbonara ever. Everytime you think of carbonara, you think of that creamy based pasta with bacon and mushrooms. This is different. Authentic carbonara sauces contain no cream – healthier and really really delicious!

After that meal, we decided we needed to replicate ‘real carbonara’.

When I was in UK, I chanced upon woman&home Feel Good Food magazine, and found a recipe on real italian carbonara.

My sis gave it a try today & I”m glad to say it’s a success!

It’s so simple to make and tastes really really good too!

Real Italian Carbonara – adapted from woman&home Feel Good Food magazine (UK Edition)

Preparation time: 5 minutes
Cooking time: 15 minutes
Serves: 2
Difficulty: Easy

Ingredients:

  • 200g Spaghetti
  • 125g Smoked Bacon
  • 1 Garlic clove, chopped
  • 50g Parmesan, grated, plus extra to serve
  • 2 Free range egg yolks & 1 whole free range egg, beaten
  • Handful of parsley for garnishing
Directions:
  1. Cook spaghetti according to the pack instructions. Meanwhile, heat  anon-stick pan and, when hot, cook the bacon until crisp. Remove the bacon from the heat, add the garlic, stir and immediately remove the garlic from the pan to prevent it from burning. Drain on a kitchen towel
  2. Mix the parmesan into the eggs and season with pepper. When the pasta is cooked, drain thoroughly and return to the pan. Switch off the heat, then stir through the egg mixture. The heat from the pan (though not on), and the pastas should cook the eggs without curdling them.
  3. Stir the bacon, garlic and parsley and serve immediately, with a sprinkling of parmesan and black pepper, if you like
Per serving: 750 calories, 35g fat (13g saturated), 76g carbohydrate
Hope you guys will enjoy this dish as much as I do!
Love
Eug